
A Comprehansive Guide to Create APK from Android Studio

How to Create APK from Android Studio an APK the usage of Android Studio is a easy task. But for novices, it would appearance tough. Don’t worry. In this guide, we can give an explanation for the whole thing really. You’ll learn grade by grade how to build an APK. We’ll also explain what APK way and why it’s essential. Let’s start.
What is an APK?
APK stands for Android Package Kit. It is the file format used by Android. All Android apps are available in APK format. When you down load an app from the Play Store, it installs the APK report to your phone. This report consists of all of the elements of the app. It includes code, resources, assets, and certificate. Without an APK, an Android app can not be hooked up.
Why Create an APK?
There are many reasons to create an APK:
- You want to test your app on a actual device.
- Send the app to your pals.
- You need to upload your app to the Play Store.
- You need to backup your app.
- Publish your app on 0.33-celebration shops.
No matter the reason, you will need to create an APK file. Android Studio makes this process very easy.
What is Android Studio?
Android Studio is the respectable IDE for Android development. IDE stands for Integrated Development Environment. Supplied by way of Google. It allows you to create Android apps using Java, Kotlin, or C++. It has all the equipment you want. With Android Studio, you can design, code, take a look at, and construct your app.
Now let’s go step-by-step to create an APK.
Install Android Studio:
First, down load Android Studio from the official internet site: Choose your platform (Windows, macOS, or Linux). Follow the setup commands. After installation, open Android Studio. You can also want to put in some SDK equipment. Make positive you download the modern day SDK. Also, set up a system photo if you want to apply the emulator.
Open or Create a Project:
Now, you need a project. If you already have a project, just open it.
To create a new project:
- Click “New Project”.
- Choose a template (like Empty Activity).
- Give your mission a name.
- Set the bundle name and keep location.
- Choose the language (Java or Kotlin).
- Set the minimum SDK (Android five.0 or better is secure).
- Click “Finish”.
Wait for the Gradle build to finish. It may take a few minutes.
Check the Code and Resources:
Before you build the APK, check if your app is working. Make sure:
- There are not any errors.
- The app compiles effectively.
- All photos, layouts, and documents are within the proper folders.
You can also test the app using the emulator or a real phone. Just click the green Play button to run it.
Build the APK File:
Now it’s time to build the APK. Android Studio gives you two main options:
- Debug APK
- Release APK
Debug APK:
This is for testing handiest. It isn’t always signed with a release key. You can set up it on your phone, however you can not post it on the Play Store.
To build a debug APK:
- Go to Build on the pinnacle menu.
- Select Build Bundle(s) / APK(s).
- Click Build APK(s).
Android Studio will start constructing. When it is achieved, you’ll see a message in the bottom-proper nook.
Click “find” to discover the APK document. The file might be in:
ProjectFolder/app/build/outputs/apk/debug/
You will see a file like app-debug.apk.
Release APK:
This is used for publishing. It is signed with a keystore. It is optimized for performance and security.
To build a release APK, follow these steps:
Create a Keystore:
You must first create a key to sign the APK.
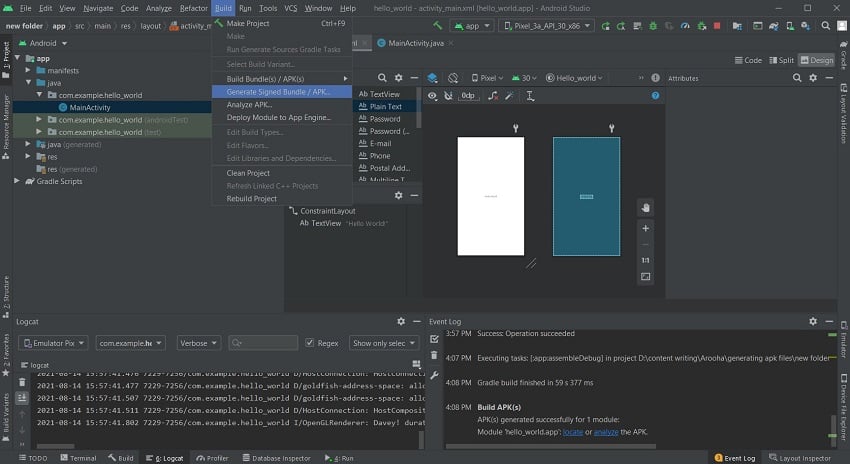
- Go to Build > Generate Signed Bundle / APK.
- Select APK and click Next.
- Click Create new below Key save path.
- Fill in the details:
- Key shop direction: Choose where to store the report.
- Password: Create a robust password.
- Key alias: Give a call to the key.
- Key password: Can be the equal or distinctive.
- Fill in certificates information (call, metropolis, united states of america).
- Click OK.
Now your keystore is ready.
Generate the APK:
- Back in the Generate Signed APK window, use the keystore you created.
- Enter the passwords.
- Choose launch as the construct type.
- Click Finish.
Wait a few minutes. Once done, your APK will be ready. You’ll find it here:
ProjectFolder/app/build/outputs/apk/release/
Look for app-release.apk.
Test the APK File:
Before sharing or uploading, test the APK.
To install it on your phone:
- Transfer the APK document for your device.
- Enable “Install from Unknown Sources” in settings.
- Tap the APK report and installation it.
Make sure the app runs smoothly.
Share or Upload the APK:
You can now do many things with the APK:
- Share it thru e mail or document sharing apps.
- Upload it to Google Play Store.
- Use third-celebration app stores.
- Distribute it on your website.
If you want to upload it to the Play Store, you need to create a signed release APK or an AAB (Android App Bundle).
Additional Tips:
Here are some helpful tips when building an APK:
Use ProGuard:
ProGuard helps to shrink and obfuscate your code. This makes the APK smaller and more secure.
To enable it, edit the build.gradle file:
buildTypes {
    release {
        minifyEnabled true
        proguardFiles getDefaultProguardFile(
            'proguard-android-optimize.txt'), 'proguard-rules.pro'
    }
}
Use Build Variants:
You can create more than one APKs for exceptional versions. This allows in testing and focused on distinct customers. Switch among debug and release modes using the Build Variants tab.
Check APK Size:
To check how huge your APK is, proper-click on the report and see its length. Try to maintain it small for better overall performance. You can also use Android Studio’s APK Analyzer tool to investigate the APK.
Use AAB Instead of APK:
AAB stands for Android App Bundle. It’s a more moderen format. Google recommends importing AAB rather than APK to the Play Store.
To build an AAB:
- Go to Build > Build Bundle(s) / APK(s) > Build Bundle(s).
Troubleshooting
Here are some common issues and solutions.
APK not building:
- Check if Gradle is syncing.
- Clean the task and rebuild.
- Go to Build > Clean Project, then Build > Rebuild Project.
Error in signing APK:
- Check the passwords.
- Make sure the keystore record is in an appropriate place.
- Use legitimate characters in passwords.
App crashes after installing APK:
- Check logs using Logcat.
- Also, Test on more than one devices.
- Make positive all permissions are blanketed.
Recommended: How to Sign an Unsigned APK File
Conclusion
Creating an APK in Android Studio is simple. Whether you’re a newbie or a pro, the stairs are clean to follow. Just build your undertaking, pick debug or launch mode, and Android Studio does the relaxation. Always check the APK earlier than sharing. If you’ll post, signal your APK nicely. Also, don’t forget using AAB for Play Store apps.
With practice, creating APK files will become part of your daily workflow. Now go ahead and build your first APK!